
How to Take Scrolling Screenshots on Windows and macOS
Use Snow Shot on Windows or macOS to take a long screenshot of a webpage, chat or wide table. Select the scrolling content, capture manually or automatically, inspect the stitched preview, then trim and copy or save the result. Scrolling capture joins overlapping views; let the page settle, return to the desired starting point and close overlays before you begin.
Select the content and start
- Use the screenshot shortcut (F1 on Windows or Control+1 on macOS by default). Select only content that changes while scrolling. Exclude fixed headers, chat inputs, sidebars and scrollbars where possible.
- Click Scrolling screenshot in the screenshot toolbar; its default local shortcut is L. The region enters scrolling capture, with a stitching preview and controls beside it.
- Choose Vertical scrolling or Horizontal scrolling. Try a short manual scroll to confirm the correct panel. Changing direction clears the existing stitch and trim range, then starts capture along the new axis. Save the old result first if needed, and choose the direction before continuous capture.
- Keep the pointer in the content region and scroll smoothly, retaining overlap between frames. The preview should grow with new content. Returning to captured content should not append it again as a whole new page. Inspect earlier content in the preview as described below.
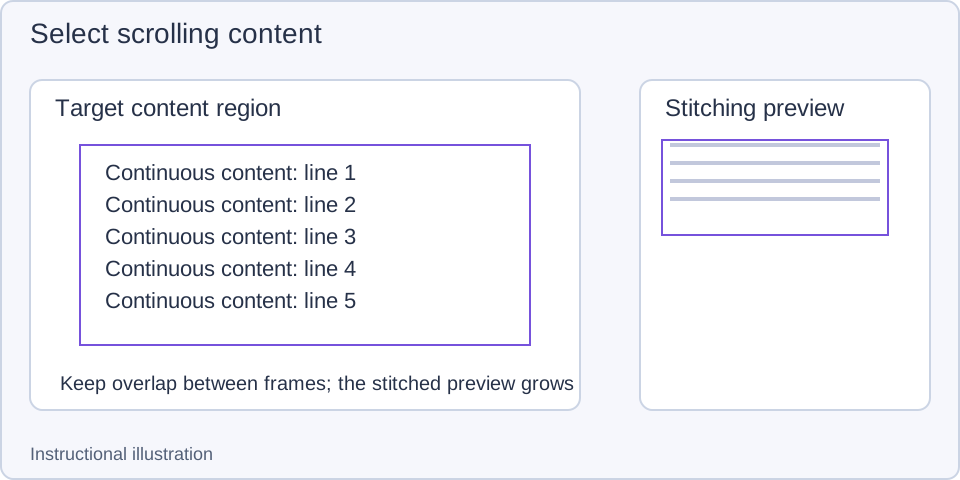
1. Select the content — Exclude fixed headers and input fields before entering scrolling capture.
- — Exclude fixed headers and input fields before entering scrolling capture.
- — Use small overlapping scrolls and inspect preview growth and seams.
- — Stop automatic scrolling and drag preview boundaries to retain the needed content.
- — Copy or save, then examine the top, middle and bottom of the full image.
Manual, automatic and horizontal scrolling
In manual mode, you control the target app's wheel or scrollbar. Horizontal content requires an input that actually scrolls that panel horizontally. If the wrong panel moves, pause, return the pointer to the correct region and try a small scroll.
Toggle Auto-scroll to send scroll input in the selected direction. Click again to stop input while keeping the stitched result for inspection or continuation. Auto-scroll interval accepts 128–1000 ms. Larger intervals allow more time for updates; smaller intervals send input more often. Click the value to reset to 200 ms. Try the default first and increase it for slower content.
Automatic scrolling does not guarantee that the target app accepted the input. If the preview does not grow, check whether the panel can scroll manually, whether it reached the end and whether an overlay intercepts input. An enabled automatic toggle alone does not establish a complete image.
Inspect stitching and trim the ends
Turn off Auto-scroll before hovering over a section of the thumbnail. The corresponding stitched detail temporarily appears inside the original capture region. Moving away from the thumbnail restores the source page. Ordinary hover detail is disabled while Auto-scroll is on. When a long preview has a scrollbar, scroll inside it to browse captured content. This differs from scrolling in the original content region to capture new content.
To remove the beginning or end, stop automatic scrolling and point at a trim boundary in the preview. When the resize pointer appears, hold the left button and drag. Vertical captures use top/bottom boundaries; horizontal captures use left/right. Nearby content is shown during the drag. Release to retain the chosen interval. To restore content while the result remains available, drag a boundary outward rather than immediately restarting the capture.
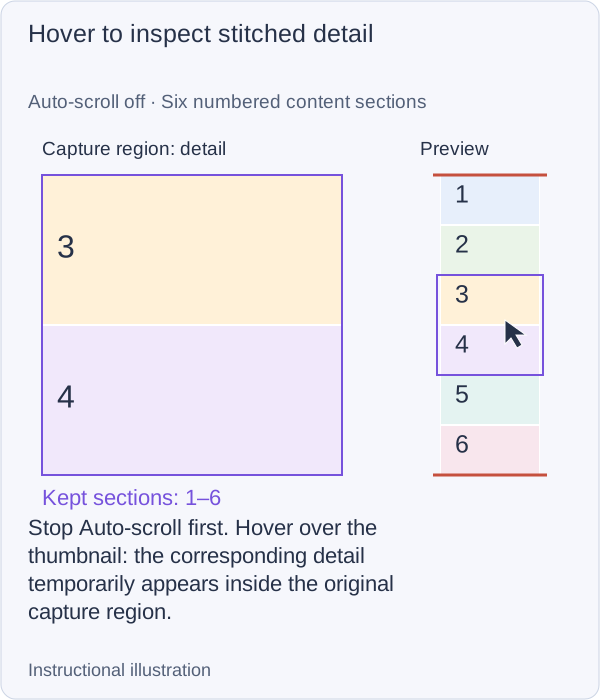
1. Hover to inspect stitched detail — Stop Auto-scroll first. Hover over the thumbnail: the corresponding detail temporarily appears inside the original capture region.
- — Stop Auto-scroll first. Hover over the thumbnail: the corresponding detail temporarily appears inside the original capture region.
- — Hold the start boundary and drag inward. Here sections 1–2 are excluded; the detail follows that boundary.
- — Release the start handle, then drag the end inward. This example now keeps sections 3–5.
- — Before exporting, drag the start boundary outward. Section 2 is restored from the retained stitch; you need not capture it again.
- — Release and move away from the thumbnail. The source page is visible again; sections 2–5 remain selected for output.
The region can move only along the current scrolling axis. In horizontal mode, hold Move selection horizontally (press and hold to drag) and drag left or right. In vertical mode, hold Move selection vertically (press and hold to drag) and drag up or down. The other axis control is disabled. Release to finish; the region’s width and height stay unchanged. Stop automatic scrolling before adjusting so movement does not obscure stitching changes. For major region changes, prepare the content and start a new capture to make the result easier to check.
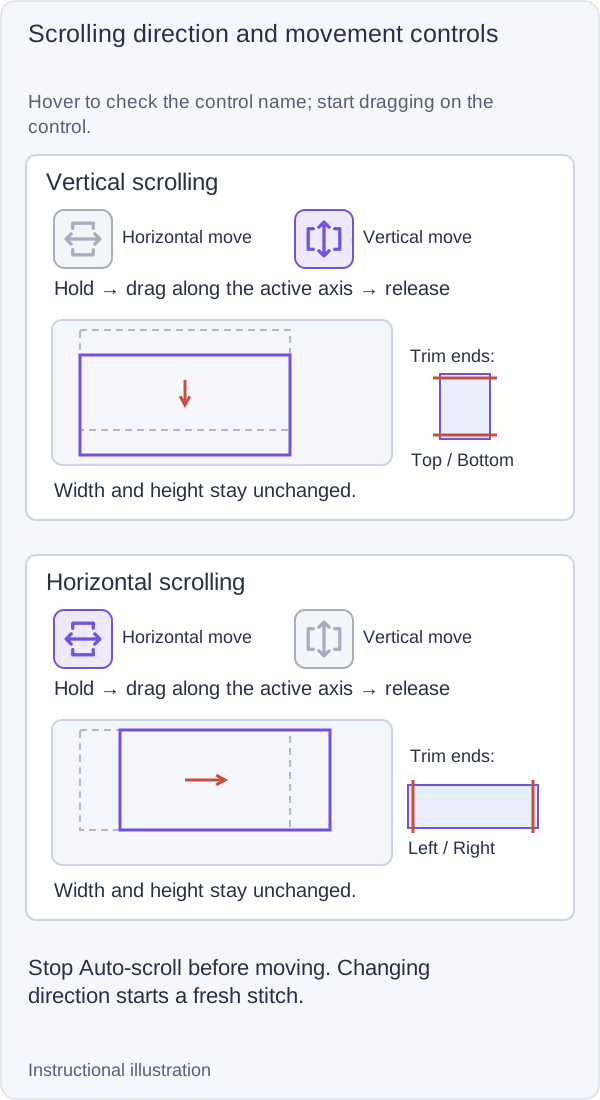
Instructional illustration: A focused comparison of direction and movement controls. Hold the movement button itself to start the drag, then release to finish. View full size.
Finish and obtain the long image
Stop automatic scrolling and browse the entire preview. Confirm there are no missing lines, duplicates or moving overlays, then choose the destination:
See image editing and splitting.
To exclude Snow Shot’s own toolbar or thumbnail preview, hover over the scrolling toolbar controls to find Settings. Open Scrolling screenshot settings and turn off Capture UI during scrolling screenshots. This does not remove fixed headers in the target app or webpage; exclude those when selecting the region.
Changing the switch and clicking OK clears the existing stitch and trim range and starts capture again. The region and scrolling direction stay unchanged. If you need the current long image, save it first, then start a new capture. Cancel leaves the setting unchanged. Clicking OK without changing the switch does not restart capture. If a message says the setting could not be saved, keep the current result and reopen Settings to retry.
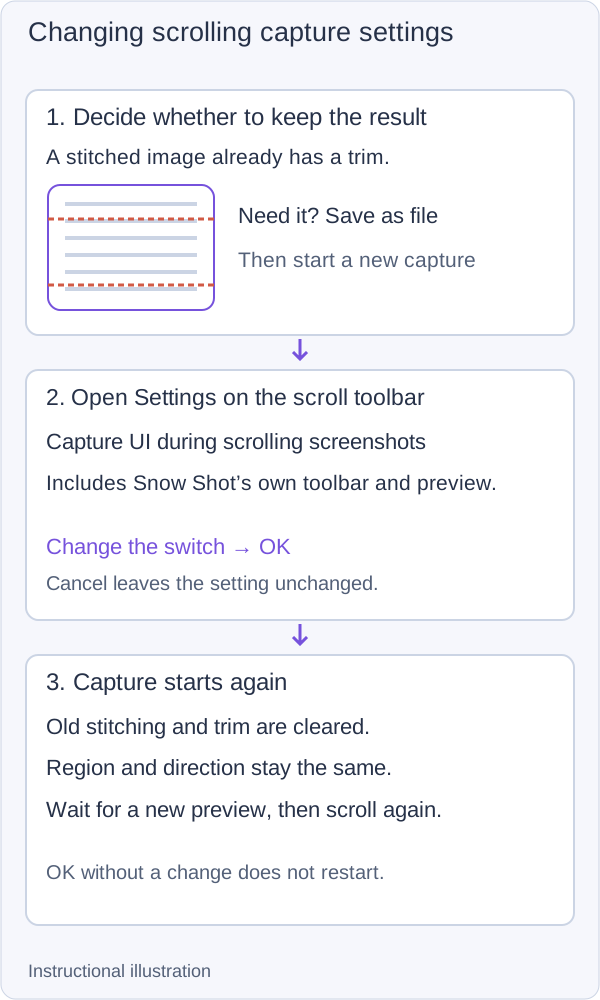
Instructional illustration: capture after a settings change starts fresh rather than extending the old stitch.
Incorrect stitching
If the saved image has repeated headers, misaligned seams, or missing lines, follow the scrolling screenshot troubleshooting guide to find where the stitch went wrong and test a shorter capture.
Keep window size, page zoom and display configuration stable during capture. Virtual lists replace visible content, and video continually changes pixels. If capture remains unstable, take shorter sections rather than treating an unchecked preview as a complete record.
Next: Text recognition · Splitting long images · Saving formats and locations.