
macOS permissions and first use
macOS controls screen capture, system input, and microphone access separately. Decide which features you need, then follow Snow Shot's permission prompts into system settings. Windows does not use this macOS permissions panel.
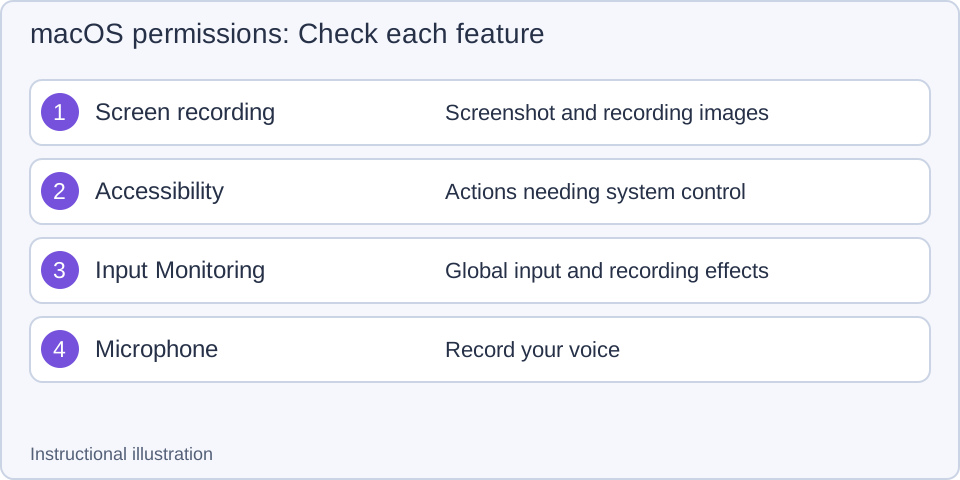
Instructional illustration: check each permission separately. Allowing one does not automatically allow the others.
Check permissions from the app
- Open Settings → App permissions in Snow Shot's main window and inspect status. You can also use the guidance shown the first time a capture or another action needs access.
- Find a permission that is not authorized and click Go to settings. Check that the app in the privacy list is the Snow Shot copy you are running.
- Allow access as the system requests. If it asks you to quit and reopen, finish other editing or recording first, then restart Snow Shot.
- Recheck the app's permission page and perform the relevant action. The Authorized status and a successful result are separate checks; investigate further if either is missing.
Drag the app and enable access
This guidance applies to Screen & System Audio Recording, Accessibility, and Input Monitoring. Follow the next section for microphone access.
The helper uses the running copy’s name; Mini appears as Snow Shot Mini. Check the copy you are using.
- In App permissions, click Go to settings for the relevant permission. When System Settings opens, locate the permission helper beside it.
- If the current Snow Shot is already in the permission list, turn on its system switch. Otherwise, hold the Snow Shot application row in the helper, drag it into the permission list in System Settings, and release. Check that the entry actually appears; dragging alone does not grant access.
- Turn on access for the current copy in the system list. Reopen the app if the system requests it, then check for Authorized in Snow Shot. Perform a capture or the relevant action and confirm the expected result.
The application row appears only when it can be dragged. If it is absent and the helper asks you to open the installed application, launch the installed Snow Shot and retry. If the permission is restricted by an administrator, the administrator must handle that restriction; dragging the app cannot remove it.
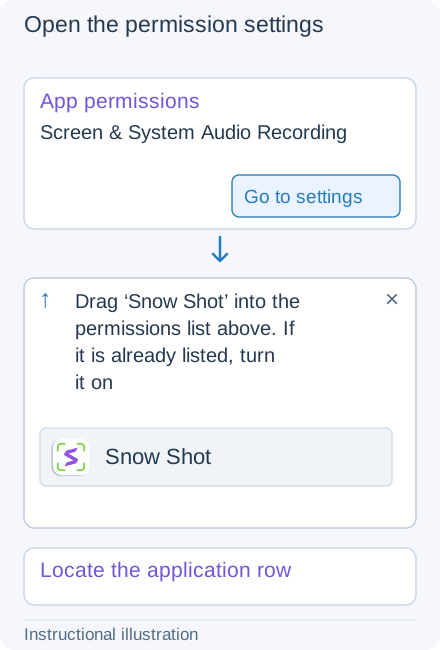
1. Open the permission settings — Click Go to settings in App permissions. With System Settings in front, locate the helper and its Snow Shot application row.
- — Click Go to settings in App permissions. With System Settings in front, locate the helper and its Snow Shot application row.
- — If the current copy is absent, drag the helper’s application row into the permission list and release. Check that Snow Shot appears; do not add another entry if it is already listed.
- — Turn on access for the current Snow Shot in the system list and restart if requested. Recheck Authorized in the app, then perform a capture or the relevant action. Dragging alone does not grant access.
Request microphone access for the first time
- Open Settings → App permissions → Microphone and click Go to settings. If microphone access has not been requested before, the helper shows Request access. Click it to make the request. The microphone flow does not use an application drag row.
- Requesting… cannot be clicked again. Allow access in the macOS microphone prompt, then wait for the system result. The request ending does not itself mean access was allowed.
- After the system grants access, the helper closes automatically. Recheck Authorized for Microphone in Snow Shot, then record an MP4 with the microphone enabled. Stop it and play the file to check that your voice is audible.
If microphone access was denied before, the helper directs you to enable it in System Settings instead of showing the first-request button again. If it says microphone access is unavailable, open the installed application as instructed and retry. Resolve any administrator restriction first.
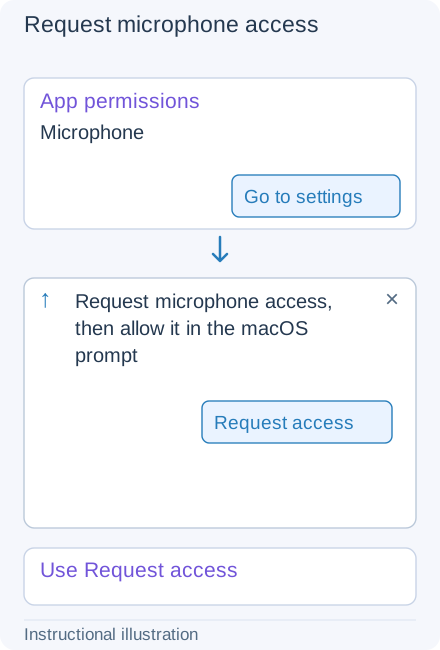
1. Request microphone access — If microphone access has not been requested, use Request access in the helper opened from Go to settings. The microphone flow does not use an application drag row.
- — If microphone access has not been requested, use Request access in the helper opened from Go to settings. The microphone flow does not use an application drag row.
- — Requesting… is disabled against repeat clicks. Allow access in the macOS microphone prompt and wait for the result; the request ending does not itself mean access was authorized.
- — After the system grants access, the helper closes automatically. Recheck Authorized for Microphone, then record an MP4 with the microphone enabled, stop it and play it to check audio.
Continue after closing the helper
The helper's upper-right × (Close guidance) only hides the help. It does not revoke system permissions or cancel a microphone request that has already been sent. Switching to another app, minimizing System Settings, or closing it can also hide the helper. Its disappearance does not mean authorization is complete.
Recheck App permissions in Snow Shot. If it still shows Go to settings, open that system permission page again. Preparation is complete only when the Authorized status and the actual task result are both correct.
When each permission is needed
Enabling a recording webcam may also trigger system camera permission. Microphone, webcam, and system audio are separate inputs. Having microphone access does not prove system audio was recorded. See recording audio and webcam for setup and sound checks.
Capture remains black or an action still fails
A permission change has not taken effect. Check whether the system requires an app restart. Quit and reopen the copy you are using, then recheck status.
Several Snow Shot entries appear in system settings. Identify the actual launch path. Applications and the mounted DMG may each contain a separate copy. Allow the copy you are using and retry; do not rely on the displayed name alone.
Only some content can be captured. Compare with an ordinary window first. System- or application-protected content may remain uncapturable even when access is granted.
A shortcut still does nothing. Check your binding and key conflicts, then inspect registration under shortcut settings. Fresh configurations use Control+1, not Command+1. Permissions do not explain every shortcut failure.
Before reporting an issue, note the macOS version, Snow Shot version, actual app path, and failed action. Use log export for diagnostics, and check for personal paths you need to remove before sharing.