
How to Record Your Screen on Windows and macOS
Open Screen recording in Snow Shot, select the area to record, then click Start recording. Use MP4 if you need sound, or GIF, APNG, or WebP for a silent animation. Both Full and Mini can record the screen. On macOS 15 or later, allow Screen & System Audio Recording in macOS permissions before you start.
Enter recording and choose the area
- On the main window's Global shortcuts page, find Screen recording and click the action row's title or empty area. The key button on the right configures a shortcut. In the selection interface, drag the area to record and release the mouse. Alternatively, start an ordinary screenshot, select an area, and click Screen recording on its action toolbar. The recording border and toolbar indicate that recording is ready to set up.
- Before starting, expand Export settings to enable area adjustment. Drag an edge or corner to resize, or drag the move control at the area's lower-right corner to reposition it. Release to finish. Check that the window and any menus you will demonstrate fit inside the border; the toolbar moves with the area. Press Esc during a drag to restore the previous area, then release before trying again.
- In the same Export settings, choose MP4, GIF, APNG, or WebP under Recording format. Choose MP4 for sound; the other three produce silent animations.
- For preparation time, scroll over Delay recording (scroll to adjust) to select 0–10 seconds in one-second steps. Click that control to reset it to zero. Click Start recording; if a delay is set, wait for the countdown to finish before demonstrating your actions.
Before starting, click Close recording to leave setup without starting capture. While the countdown is still running, Close recording cancels it and exits. Once recording has started, paused, or entered processing, you cannot resize the capture area as you can during preparation. Stop this recording and select a new area when you need a different scope.
1. Adjust the recording region · Before starting, resize by the border or move with the lower-right control.
Control recording by its current state
Start, pause, and resume share a configurable recording shortcut action that responds to the current state. Check your binding under Settings → Application shortcuts → Screen recording or in the button tooltip. Avoid repeatedly clicking during startup or stopping.
Close recording leaves the recording window. If Settings → Screen recording → Interaction → Delete files on recording close is enabled, closing an active or paused take discards its unfinished data. If it is off, closing stops capture and continues processing the output. This option does not delete previously exported files. Use stop or copy when you need the result, and wait for processing to finish.
Do not use Close recording to cancel an export. If stopping or a trim export is already being processed, that work continues after the recording interface closes. To interrupt rendering, use Cancel in its progress window and wait for the final state. A disappearing window alone does not show whether the file was saved or canceled.
Control the toolbar and status prompts
Under Settings → Screen recording, you can change:
- Capture toolbar during recording: include the recording toolbar when you want viewers to see the controls; turn it off to exclude them.
- Auto-hide toolbar: near the left or right screen edge, the toolbar retracts when the pointer leaves. Hover over the edge control to show it again.
- Show recording status prompts: show the format, microphone, and system-audio status in the center of the effect preview area. Check audio before starting.
- Auto exit after recording ends: leave the recording interface automatically after saving.
- Notify after export completes: show a system notification; click it to locate the output file.
The directory and filename are configured under Settings → Export & storage → Video export. The usual location is the system video directory. If the configured directory is unavailable, the app also tries the system video and Documents directories. Enable Notify after export completes and click the completion notification to locate the actual file. To remove the beginning or end, enter the trimming preview before exporting.
Recording will not start, or the result is missing
On macOS, first check Screen & System Audio Recording permission under Settings → App permissions. Sound, webcam, and keystroke display also require their corresponding devices and permissions. Windows offers recording API choices under Settings → Screen recording → Recording content. For a black or incompatible capture, switch the API and make a short test recording. Different APIs do not guarantee access to protected content.
If the recording directory cannot be created, select a writable directory under Video export. During rendering after an ordinary stop, click Cancel if needed and wait for cancellation to finish. After cancellation or failure, the window shows the preserved source folder and offers Retry, Keep source files, and Discard. Retry renders again; keep the source files to handle them later; discard only when you no longer need this source data. Do not clean temporary recordings first. Saving from the trimming preview has a different cancellation flow.
For Snow Shot installed through Microsoft Store, reopening the app after Windows ends a session and interrupts a recording may show a recovery prompt. If a recoverable recording source exists, choose Recover to enter the trimming preview, then export the recording to a file. Use Open folder to inspect the retained data. Check that the completed file plays before cleaning up source files you no longer need.
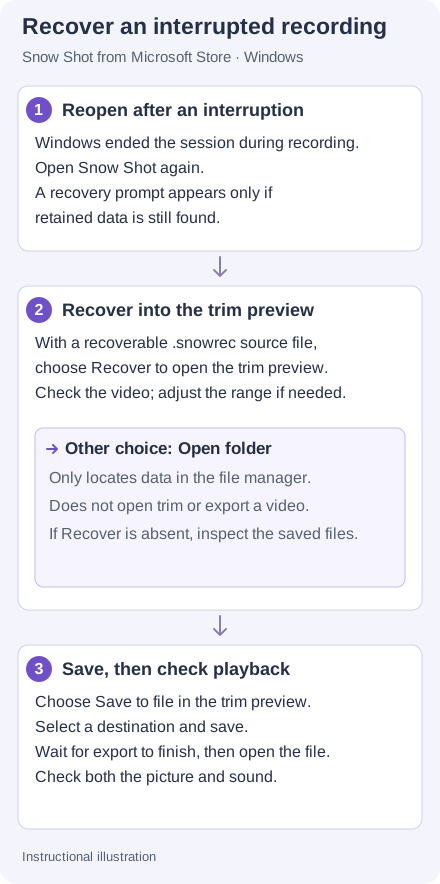
Instructional illustration. Recover opens the trimming preview first; Open folder only locates retained data and does not export a recording.
Continue with audio and webcam, mouse and keystroke effects, or trimming, speed, and export.